Friday, 11 November 2011

Combat Dreariness with Pink Lips

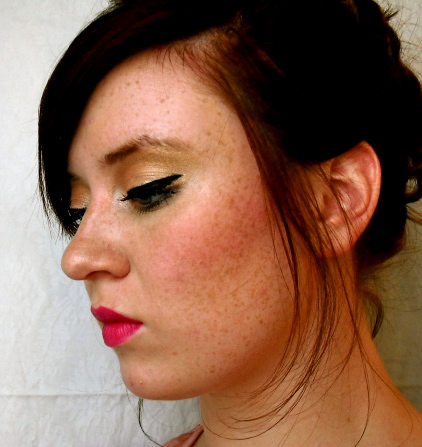
I become quite pale in the autumn/winter time (which I rather like) which is one more reason why I love bold colored lips.  It's a lovely way to spruce up a dreary day :)

I lined my eyes with Maybelline's EyeStudio Lasting Drama gel liner in blackest black and put champagne shadow all over my eye lids.  I wore Covergirl Lip Perfection in Eternal.


Do something incredible this weekend!

Molls

Wednesday, 9 November 2011

Halloween Marie Antoinette Makeup

After seeing Kandee Johnson do this look on her blog last month, I finally knew what look I wanted to create for Halloween! So thank you Kandee :)

I was in a humongous hurry when I recreated the look so this post is not a step-
by-step tutorial. I can do it again if anyone really wants though :)


Here is Kandee's version of Marie Antoinette:


Products I used:
Maybelline EyeStudio Lasting Drama gel liner in blackest black
Maybelline blue eyeshadows (I don't know the specific names)
Stila smudge pot in Kitten
Sephora fake eyelash strips on the top and bottom lashes
Covergirl Lip Perfection in Eternal


Mallory did this feathered look on hersefl!!! I was super impressed and it turned out splendidly! 


Friday, 28 October 2011

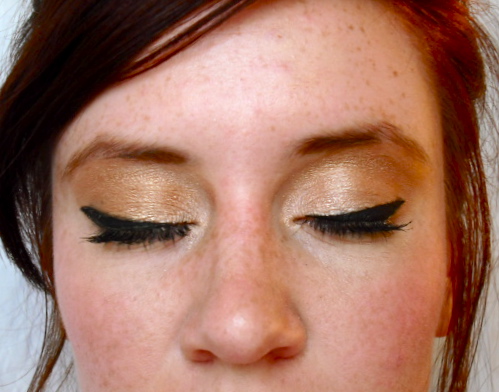
Makeup Day: Brown and Gold


 Hello lovelies! (And yes, I made that term of endearment up years ago and now other bloggers use it...But I'm sure I was first!!!) You know the hipster version of things when everyone else catches on to an idea so the hipster no longer thinks it's cool. Part of me feels that way with this term. But I shouldn't be so hipster about it. I'm STILL going to use it. Take that hipsters.

Since it's been a long week, I'm simply posting pictures of a typical makeup look I do when I can't think of something or am in a hurry. I might post a how-to on it at a later date, but for now enjoy the images!

P.S. I just want to admit something...I'm petrified of titling posts. In high school I begged my mom to help me title my papers (which meant I told her the subject and she came up with a title). I don't know why but I have the hardest time with it so I DESPISE the part when I have to fill in that despicable box. Here I go, I have to come up with a name...AHHHHHH!!! There, I did it.


Monday, 24 October 2011

DIY lampshade decoupage

Again, I've been in a crafting mood so the next victim of this fit was the lampshade. Poor thing. He was naked so I used my skills so give clothe him and therefore, show him kindness. AND now others shades cannot poke fun at him. I've done society a service. Here's the scene of action:


Step 1. Find a plain lamp shade.


Step 2. Take mod podge and a paint brush, and plaster it all over the shade.
Then strategically place sheet music over the shade. I chose to angle them
so that it didn't seem perfect. I like the jaunty angles that say "I'm laid back but
still care about my appearance."

Step 3. This is the finished product!


I like crafting! Especially when it spruces up the apartment. My roommates and I have deemed the place the "Etsy Apartment" because it's so eclectic and creatively decorated. It's very homey. I'll make a post about it in the near future.

Friday, 21 October 2011

It hurts, it hur...Oh, never mind. It's just makeup.


With Halloween around the corner, I thought why not publish another post about special effects makeup? (In all actuality, it's just my latest makeup obsession and has nothing to do with the season. I'm  expanding my repertoire basically). 


I always thought that to create special effects looks you had to have high quality theater products, and for this reason have not attempted it. And yes, the higher quality the better the look as with most anything. However, what you're about to see I created with simple craft and makeup products. IT'S SO COOL!!!

I get a tad pumped about this stuff. It's just so smashingly cool. So, so, so, so. Very so. I know I'm not the only one who feels this way. Right??

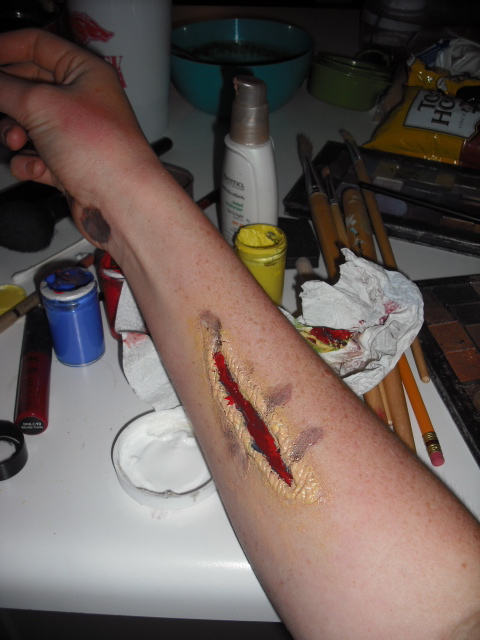
Back to the topic, here's how you can create a gory wound for Halloween or any time you want to give your friends a fright.

Supplies needed: 
1. Mod Podge (I bet other glues would work just as well) 
2. face paint (mine was a cheap brand) I used yellow, red, and blue.
3. tinted moisturizer or foundation (one that matches the skin where you're placing the wound)
4. eye shadow or craft brushes
5. black and brown eyeshadow (must be matte)
6. black eyeliner (paint pot form is best)


Step 1.  Using a thin paint brush, draw the outline of the cut. This will be the "skin" that sticks up and gives it a 3-D effect.  (This is the longest step because you have to wait for it to completely dry)


Step 2. Soften the yellow paint with moisturizer (or regular lotion) and smooth all over the wound to create sickly, jaundiced skin. Paint some of it outside the glue perimeter, because cuts are not perfect. 

Note: Don't you love the extra supplies I added? Chocolate chips make the project even better :)

Step 3. Once the yellow is dry, paint the tinted moisturizer/foundation lightly over it.
           Then softly pat the black liner (or face paint) inside the wound.


Step 4. Blend the black until it looks soft (add moisturizer if it needs to be lighter).
Step 5. Mix a small amount of blue paint with the red to achieve a more realistic blood color. (Most red face paints are too orange based and very fake looking). Once the black is slightly dry, pat the red over it...Don't try to make it look perfect. Remember, this is not a painting, but a grotesque wound. NOT a pretty sight. 
Step 6. Mix the brown eyeshadow with the foundation and blot in random patches around the wound.
Step 7. Blend black eyeshadow into the outer edges on the inside of the wound (I couldn't think of an easier way to explain that)

Step 8. Mix water with your red paint to achieve a watery base, then using a paint brush, flick it randomly onto your skin to make it look like blood spattered out of the wound.
Step 9. Blend the red if it clumps up too much. You're giving the effect of blood that's been wiped off the skin with residue left.
Step 10. Here I added another layer of red to cake it up and give a dried blood effect.
Step 11. Pat more black or brown shadow around the edges to enhance the crusty blood effect.


Step 12. For a final more realistic look, take an angle brush and lightly sweep the brown shadow in small slits over the edge of the mod podge skin. This breaks up (pun intended? : P) the perfect looking skin and makes it look more broken.

You're finished!!!

I'm in so much pain, can't you tell?


I probably should have put on mascara, because I look like a thirteen year old. Never mind, that's not the point.


Here's my roommate, Ashley with a bruise I gave her. We make quite the injured pair. My next post will be how to get her bruise. Because it's so fashionable, no?

Now go out and scare your friends!!! I actually texted a picture of it to a friend and asked "Do you have any peroxide?"...Mwahahaha. I couldn't resist. Very disturbed, she was preparing to run over and assist me before I explained. Mischief managed. We're still friends :) 

Enjoy!!

Molls

Tuesday, 18 October 2011

Black eye makeup

This week I became obsessed with learning special effects makeup. I'm impulsive, remember? I've never tried it until now, and as there's a first for everything, this was my first.
  I used random around-the-house products and regular makeup to do it and am quite proud of the results. Now that I've practiced, I'm going to invest in quality theater/SE makeup for a better second round.

I didn't have any matte eye shadows in the colors I needed so I used lipsticks, eye liner, face paint (super cheap brand), and tinted moisturizer.

Check out the fun I had!!

I used Maybelline gel eyeliner in blackest black here. Then I realized the first layer
should have been a yellow, bruises aren't black. Silly me.

So I softened it with Covergirl lipstick in Smitten

more blending

You can tell I'm thrilled, right?

Using a cheap face paint brand, I mixed red and blue to get a deep purple

Even more blending. Then I added in a light pink lipstick.


Can anyone guess what I did here? That's right, MO blending.

And my attempt at an "I don't feel good" face.

All in all, it was a great first time. I looked at a picture for reference but wasn't able to watch a tutorial because youtube wasn't working. I learned a lot and can't wait to try it again...Next time with matte eyeshadows so it won't be shiny and I especially need to get a yellow.

Next post I'll be showing a gruesome gash I did on my arm!!! Don't miss it. Even though it's my first time for that (and I didn't have super quality products), it turned out pretty wicked awesome.

Until next time,

Molls